


G'day! Ready to enjoy a hot shower out in the Aussie bush or at a caravan park by the coast? No worries – setting up a Camplux portable water heater is a breeze, even if you're not a tech guru. This step-by-step guide will walk you through installing three popular models (6L AY132, 8L BV158, and 10L F10) – all of which share the same process. We'll cover unboxing, installation, and tips for camping, off-grid, and caravan setups. So, grab a cuppa and let's get your hot water sorted, Aussie style!
Step 1: Unboxing – What's in the Box?
Before we dive into installation, let's see what you've got. Camplux portable heaters come with all the essentials you need for setup. In the box, you should find:
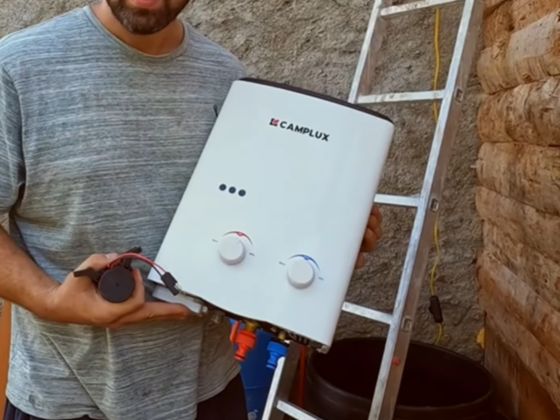
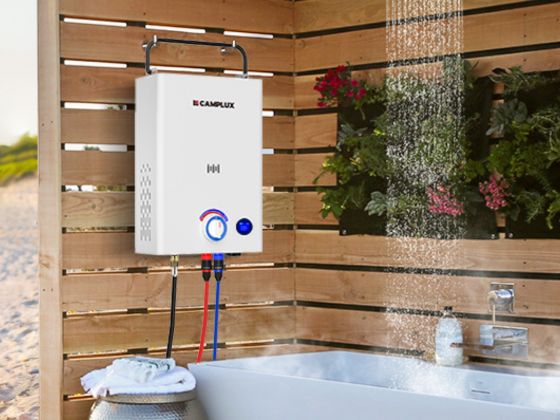
The Water Heater Unit: The main appliance itself, with control knobs on the front and water/gas connections at the bottom
Gas Regulator and Hose: An AGA-certified gas regulator attached to a hose
Shower Head and Hose: A handheld shower head (often with an on/off trigger) and a hose to deliver hot water
Bonus Items (Model-Dependent): Some kits include extra goodies. For example, the 6L (AY132) often comes with a 12V water pump for off-grid usec
Tip: Keep the box and packaging for storage. These heaters are portable, so you might pack it back up between trips to protect it. Also, remove any plastic films or foam inserts from the unit before use (common sense, but worth mentioning).
Step 2: Choosing the Right Location
Safety first, mates! Picking a good location for your Camplux heater is crucial for safe and efficient operation. Here's what to consider:
Outdoor Use Only: These heaters are designed for the great outdoors. That means never use it inside a tent, caravan, enclosed bathroom, or any indoor space – doing so can lead to carbon monoxide buildup, which is deadly. Set it up in a well-ventilated area under the open sky. If you need privacy for a shower, use a camping shower tent for yourself and keep the heater outside the tent.
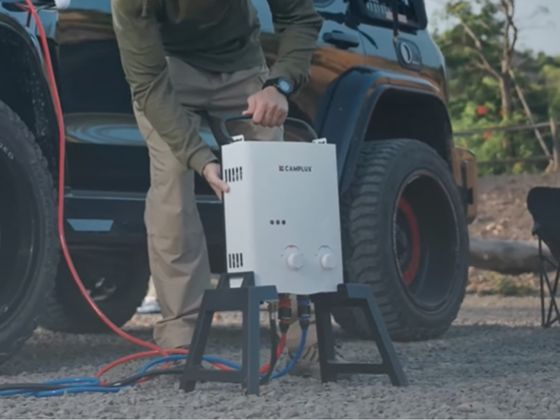
Level and Stable Surface: Find a spot that's flat or hang the unit securely. You can hang the heater by its top handle on a hook, tree branch, or a mounted bracket. Many campers place it at about waist or shoulder height for easy access to the controls. Make sure it won't tip over – the Camplux has tip-over protection (shuts off if it falls more than 45°), but we still want to avoid testing that feature!
Clear Above and Around: Ensure there's nothing flammable or heat-sensitive above or around the unit. The heater's exhaust comes out the top, so keep awnings, tarps, or tree branches well clear of the top by at least a metre or two. Sides should also be clear so air can flow. Don't place it near dry grass or leaves that could catch fire from the heat. And avoid very windy spots – a strong gust could blow out the flame or affect performance. If it's breezy, try to shield the unit or pick a calmer spot.
Safe Distance: Set the heater a safe distance from your gas bottle and living area. Typically a few metres away from your tent or van is good. You don't want splashing water on the gas connections, and you want plenty of fresh air around the burner. Also, keep it off the ground (hang it or put it on a raised surface) if possible, so the burner is elevated away from any gas that might sink low.
Aussie Weather Check: If it's raining, the heater can handle a bit of splash (it's made for outdoors), but it's not completely waterproof. Use under a canopy or during fair weather to be safe. In extreme heat, shade the unit to prevent sun damage (though the water flow will keep it cool internally). And in cold/freezing weather, be sure to drain it after use – more on that later in the winter tips.
Step 3: Connecting the Gas Bottle Safely
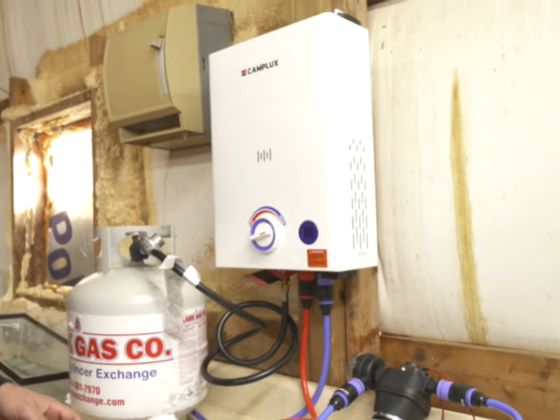
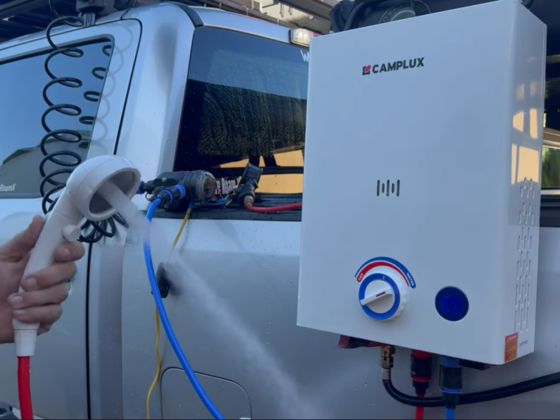
Time to hook up the gas – the fuel for your instant hot water. Camplux portable heaters run on LPG (Propane) gas, typically from a standard Aussie gas bottle (like your 4.5 kg or 9 kg BBQ cylinder). Here's how to connect it safely:
Use the Provided Regulator: Your Camplux comes with a gas regulator and hose that's compatible with Aussie LPG bottles. One end has a fitting for the gas bottle valve, and the other end connects to the heater's gas inlet (a brass threaded pipe under the unit). Do not use any third-party hose or regulator unless it's rated and approved – the included one is AGA certified for safety.
Attach to the Gas Bottle: First, make sure the gas bottle valve is closed (turn it off tight). Attach the regulator to the bottle's outlet. In Australia, most bottles use a POL fitting, which screws inside the valve (left-hand thread). Some newer bottles have a click-on connector, but POL is most common and that's likely what your Camplux hose has. Insert the regulator's brass end into the bottle valve and rotate it (usually clockwise, since it's left-hand thread) until snug. You can tighten by hand if it has a hand wheel, or use a spanner to give it a firm final tighten – just don't overdo it.
Connect to the Heater: Now take the other end of the hose and screw it onto the heater's gas inlet (bottom of the unit). It should thread on easily. Hand-tighten until secure; if needed, a gentle tweak with a wrench can ensure it's snug.
Important: Camplux specifically advises not to use Teflon/plumber's tape on the gas connections. The fittings and rubber seals provided create a gas-tight seal on their own. Adding tape can actually prevent a proper seal and might cause leaks. So if you were reaching for the tape – skip it!
Check the Connections (Leak Test): Before firing anything up, do a quick leak test for peace of mind. This is a must-do safety step whenever you connect propane gear. Mix up some soapy water (or use a spray bottle with soapy solution) and turn the gas bottle valve on just slightly (a quarter turn) to pressurize the line. Slather or spray the soapy water on all connection points – around the bottle valve and the connection into the heater. Watch for bubbles. If you see a growing bubble, that means gas is escaping there. Turn off the gas, tighten the connection a bit more, and test again. No bubbles after a minute or two? Good job – you've got a leak-free connection. Turn the gas back off for now before we ignite in a later step. (If bubbles keep appearing and you can't stop a leak, do not use the system. The regulator or fitting might be faulty – get it checked before proceeding.)
Safety Reminder: Always keep the gas bottle upright and in a ventilated area. Never lay it on its side. Also, ensure no open flames or smoking near the setup while connecting the gas. It's also wise to have a fire extinguisher or water source nearby, just in case (better safe than sorry). Gas leaks are rare if you follow the instructions, but always double-check – it's a quick step that ensures your safety.
Step 4: Connecting the Water Supply (Mains or Pump)
With gas sorted, let's get the water flowing. Your Camplux can take water from a garden hose (mains water) or from a pump drawing water out of a tank/bucket. The process is similar for all models:
Find the Water Inlet: On the bottom of the unit, you'll see two ports – one labeled water inlet (usually with a blue ring or marking) and one water outlet (leading to the shower hose). The inlet might be a standard garden hose connector. On Camplux heaters, this is often a ½ inch BSP fitting that works with common hose attachments, or they include an adapter/quick-connect.
Connecting to Mains (Tap) Water: If you're at a campsite or home with a water tap, simply attach a garden hose to the heater's inlet. Often, the unit or included kit provides a garden hose quick connector, making it easy to click your hose on and off. Ensure there's a rubber washer in the hose fitting to prevent leaks. Don't turn on the water yet – we'll do that when firing up. Just make sure the connection is secure (hand tight is fine; the O-ring/washer will seal it.
Connecting to a Pump (Off-Grid): If you don't have pressurized water, you'll use a 12V pump to feed the heater. The 6L model often comes with a pump included, and other models are compatible with most camping water pumps. Hook it up as follows: one side of the pump has a hose that goes into your water source (e.g. a jerry can or bucket). The other side of the pump's hose connects to the heater's water inlet. Again, a quick-connect fitting might be provided to make this easy – for instance, Camplux pumps have a red-and-white quick connector that snaps onto the heater inlet. Make sure it clicks firmly in place. Submerge the pump fully in your water container so it primes properly. It's a good idea to have plenty of water in your container (fill it up before you start showering) to avoid the pump running dry mid-shower. If your kit didn't include a pump, any small 12V camp pump will do; just check the manual for the minimum water pressure (e.g. ~15–25 kPa) to ensure the pump is strong enough. Most camping pumps are fine.
Double-Check Inlet Connection: Whether using a hose or pump, give the inlet connection a tug to confirm it's not loose. A loose hose could pop off when water pressure builds and spray water everywhere – not the kind of shower you want!
Note on Water Pressure: Camplux heaters are pretty good with low water pressure. The 6L will start with just 15 kPa (almost a trickle), and the 8L needs around 25 kPa. That means even a small pump or gravity-fed water tower can get it going. On the high end, they can handle up to ~1200–1500 kPa, but if you're on mains water and you know your pressure is extreme, a regulator might be wise. Generally, normal tap pressure is fine.
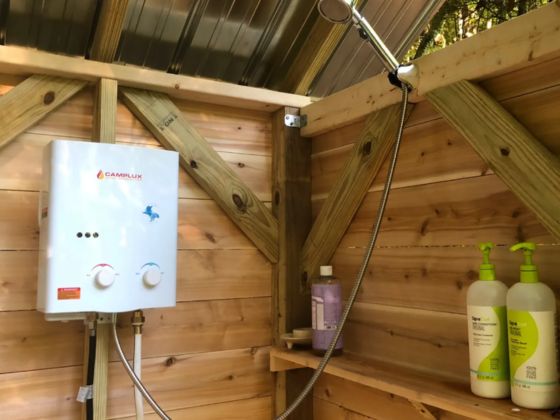
Step 5: Installing the Shower Hose and Head
Next up is the shower hose – this is where your lovely hot water comes out. Setting it up is straightforward:
Attach the Shower Hose to the Heater: The heater's water outlet (often marked with a red ring) is where the shower hose connects. Screw the hose onto this outlet snugly. Again, hand-tight should suffice if there's a rubber O-ring in the hose coupling. No plumber's tape needed here either; the seal should be water-tight with the provided gasket. If your model uses a quick-release connector for the shower, just click it in. In most cases, though, it's a threaded connection.
Attach the Shower Head: If the shower head isn't already connected to the other end of the hose, go ahead and screw it on. Some Camplux kits provide two shower head options (for example, a regular shower head and maybe a trigger spray). Choose the one you prefer and ensure it's attached securely. Many shower heads have an on/off trigger or valve – make sure it's in the "off" position for now (this prevents water from coming out as soon as we turn on the pump/tap later).
Mount the Shower Head: The kit may include a little plastic holder or hook. You can mount or hang this at a convenient height (e.g. stick it to your shower tent pole or hang on a nail/tree). This keeps the shower head off the ground and ready to use. If no holder is included, you can improvise with a hook or simply set the head somewhere clean when not in use.
Check Hose Routing: Lay out the hose so it isn't kinked and can reach your shower area. The standard hose length is about 1.5 metres – enough for most setups. If you need more length, you can use an extension or a longer hose (just ensure it's compatible and can handle hot water). For now, have the hose and shower head positioned where you plan to shower, or at least not tangled up.
That's it for the water connections! At this point, your system is all hooked up: gas connected and tested, water source connected, and the shower hose attached. We're almost ready to fire up the heater.
Step 6: Safety Check – Before You Ignite
You're nearly ready for hot water, but do a final once-over safety check. This ensures everything is in place for a smooth first run:
Gas Leak Re-check: If you haven't already, double-check that gas leak test. It's worth doing whenever the gas has been sitting or you just feel paranoid (nothing wrong with being cautious!). A quick spray of soapy water on the connections with the gas on for a moment – no bubbles means all good. Turn the gas off again after testing.
Clear the Area: Make sure no one (especially kids or pets) is fiddling with the heater or in the immediate area when you start it. Keep the gas bottle at a safe distance (the hose length away). Remove any flammable items from around the heater. If you set up a shower tent, confirm again that the heater is outside of it, and only the water hose runs inside.
Water Flow Ready: If using a pump, have your 12V power source ready (but pump off). If using a garden hose, have the tap ready but closed. The moment we introduce water flow, the unit will attempt to ignite (since these are automatic ignition on flow). So we'll want to be prepared to observe the heater when that happens.
Batteries Installed: The ignition system in Camplux portable heaters is powered by batteries (except the Nano models which have internal batteries). For the AY132, BV158, and F10, ensure you have inserted 2 x D-cell batteries into the battery compartment. Typically, the battery compartment is a little slide-out tray or panel on the bottom/front of the unit. Check the manual for your model's battery slot location. Insert the D batteries in the correct orientation (+/- as marked). These batteries power the electronic ignition spark and sometimes an LED display (the 10L F10 often has a small digital temperature display). No electricity required beyond these batteries – a truly off-grid solution. If your unit has an ON/OFF switch or knob, set it to "ON" or standby. (Some models don't have a separate power switch – they're armed as soon as batteries are in and water flows.)
Temperature Dials to Start: Set the heater's controls to a middle position to start with. Usually, there are two knobs: one for gas flow (flame level) and one for water flow. Sometimes they are labeled as temperature and flow, or in the F10's case, a combined 2-in-1 knob system. A good starting point is medium flame and medium water flow – this often yields warm but not too hot water. You can adjust after ignition. If there's a seasonal setting (some heaters have a Summer/Winter switch to adjust burner power), set it appropriately (if it's a warm day, "Summer" or low; if cold, "Winter" or high).
Everything looks set? Sweet as! Now for the fun part – firing up your heater.
Step 7: Power On and Ignite – Getting Hot Water Flowing
Time to fire up the barbie… er, water heater! Follow these steps to safely start the unit and adjust the water temperature to your liking:
Turn on the Gas: Open the valve on your LPG gas bottle fully (or at least a few turns). This ensures enough gas flow. You should not smell any gas; if you do, pause and check connections again.
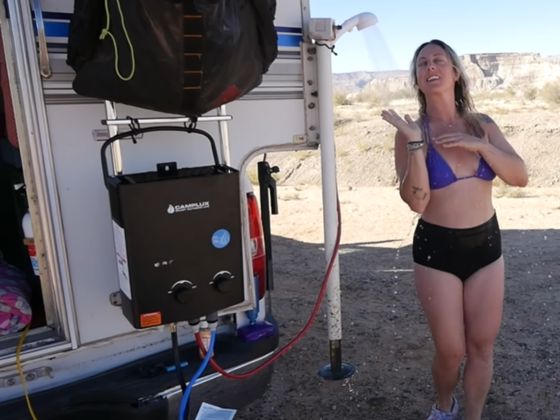
Start Water Flow: Turn on the water supply to the heater. If you're using a mains tap, slowly open the tap. If you're using a pump, switch the pump on (this might be a toggle switch connected to your battery or a plug into your car's 12V socket). Water will begin flowing into the heater. Within a second or two, the heater should automatically ignite as it senses the flow. You might hear rapid clicking (the igniter sparking) followed by a "whoomp" or soft whoosh sound when the gas ignites. This is your flame kicking on. Congratulations – you've got hot water coming!
Check Burner Operation: Once water is flowing and the burner is lit, you can usually hear the flame. Some models have a little window to see the flame, and the F10 has an LED temperature display that will light up once it's running. If the burner doesn't ignite on the first try, don't panic. Turn off the water (shut the pump or tap), wait a few seconds, then try again. Sometimes the gas line has a bit of air in it initially, which can cause a brief delay in ignition. Also ensure your batteries are installed correctly if there's no clicking. Usually, though, these units fire up straight away if everything is connected right.
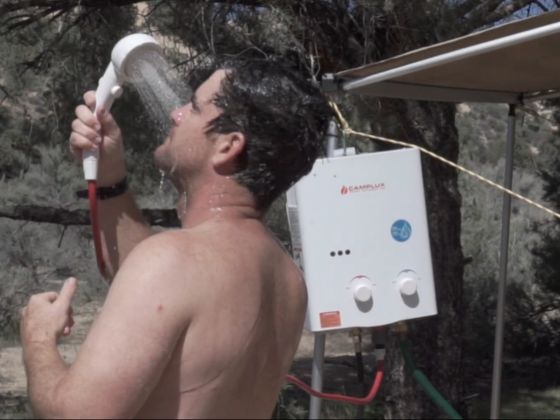
Adjust the Temperature: Now that water's flowing, adjust the knobs to get your desired temperature. Use caution here – the water can get quite hot on max settings, so find a comfortable setting before stepping under the stream. The general rule: more gas = hotter water, more water flow = cooler water (as it passes through faster). If the water is scalding, turn the gas down or increase the water flow to cool it a bit. If it's not hot enough, do the opposite – increase the gas or slow the water a tad. You'll find the sweet spot. The 10L unit can reach around 50°C output at max, so handle with care. Always test the water with your hand before showering, especially when setting it the first time or if someone else (like kids or an elderly family member) will use it. Remember, water above ~52°C can cause scalds in seconds. Aim for a pleasant warm (maybe ~38–45°C, like a home shower).
Shower Time! Once it's dialed in, you can hop in and enjoy. The shower head's trigger can start/stop the water flow while you shampoo. When you stop the water (via the shower head trigger or turning off the tap), the heater flame will automatically extinguish after a few seconds as flow stops. It will re-ignite when you resume flow, giving you continuous hot water on demand. If your shower head has an off switch, feel free to use it for quick stops (the heater will sense no flow and shut the burner, then kick back on when flow returns). Just don't leave the burner cycling on and off excessively; if you're pausing more than a minute, maybe turn off at the source to save gas.
Troubleshooting (if needed): If water is flowing but you get no hot water and no flame:
Now, assuming everything's running, you have a hot shower wherever you are. How good is that? Enjoy it!
Step 8: Shutting Down and Packing Up
After you've finished showering or using the hot water, make sure to shut down properly:
Turn Off the Gas: Go to the gas bottle and turn the valve off completely. This will cause the burner to flicker out as it uses up the remaining gas in the line. It's best to turn the gas off before turning off the water flow. This way, once the flame dies, you won't have unburned gas lingering in the heater.
Turn Off Water: Now shut off the water flow. Turn off the pump or close the tap. Open the shower head trigger to relieve any pressure left in the hose until water stops dribbling out.
Drain the Heater: If you're packing up or if there's a chance of freezing temperatures, drain any water from the heater unit. Many Camplux models have a drain plug at the bottom – open that up and let any remaining water trickle out. Give the unit a little shake to clear water from the heat exchanger. This prevents internal damage from freezing and is just good practice to avoid stagnant water sitting inside.
Allow to Cool: The unit will be quite warm just after use. Give it a minute or two to cool down. These heaters cool quickly, but it's smart to avoid touching the metal top immediately after shutdown.
Disconnect Hoses: Detach the garden hose or pump from the water inlet, and disconnect the shower hose from the unit. (Caution: some water may still be in the lines, so do this in an area where a splash is okay.) Also disconnect the gas hose from the heater (after confirming the gas is off and no flame). You can leave the regulator attached to your gas bottle if you're going to use it again soon, but for long road travel, it's wise to unscrew it and securely cap the bottle.
Pack Everything Up: Store the hose, shower head, and any accessories in a clean, dry bag or container. The heater unit itself can go back in its box or in a padded bag. Keep the batteries inside the unit for next time, or remove them if storing for a long period (to prevent any corrosion). If you're in a caravan, you might have a spot to stow the heater; if camping, often folks use a plastic crate to carry the heater and parts. Make sure everything is dry before long-term storage to prevent mold or rust.
And that's it – you've successfully set up, used, and packed away your portable hot water system. After the first run, you'll see it's pretty quick to do. Next time, you'll likely get it running in just 5 minutes or so once you find that perfect setup routine.
Tips for Different Setups
Camplux heaters are versatile for various Aussie adventures. Here are some extra tips tailored to camping, rural off-grid living, and caravan use:
Camping Setup Tips (Campsites & Outdoor Showers)
Shower Tent & Privacy: If you're at a campsite, a pop-up shower tent is a ripper idea for privacy. Set your tent a few metres from your camp. Run the Camplux shower hose into the tent while keeping the heater and gas bottle outside on level ground. This way you have ventilation for the heater and privacy for you. Use a wooden mat or old towel to stand on so you're not in the mud.
Hanging the Heater: Use a tree limb, fence, or a sturdy shepherd's hook to hang the heater at a convenient height (about waist or shoulder level). This makes it easy to reach the controls and keeps it away from puddles. The folding handle on top of the Camplux doubles as a hanger – super handy. Just make sure it's secure and won't get knocked over by wind or bumped by a kangaroo in the night!
Water Source Flexibility: Camping often means no tap water. If you're drawing from a creek or lake, use that pump and maybe put a cloth filter on the intake to catch sand or debris. Carry enough water if you're in a dry area – a 20L jerry can can give several short showers. Heat up only what you need; these units save gas by only burning when water flows.
Lighting: If you shower at night, have a lantern or headlamp since you'll need to see the heater controls and make sure everything's okay. Also, check local rules – some campgrounds have specific spots for showers or might require you to throw wastewater in a certain place (especially with soaps). Keep it eco-friendly with biodegradable soap if possible.
Off-Grid & Rural Setup Tips (Cabins, Remote Properties)
Semi-Permanent Mounting: At a cabin or off-grid tiny home, you might use your Camplux as a semi-permanent hot water system. Mount the unit on an external wall or a sturdy post near your water source. Use the provided screws/bracket for a secure attachment. Just remember it still needs open air – don't box it into a small shed without proper ventilation. If mounting on a structure, follow local guidelines – in Australia, gas appliances should have certain clearances. You might even have a professional gasfitter install a bayonet gas connection on your porch, so you can plug the heater in easily to your big gas bottle (great for frequent use).
Water Tank Integration: If you have rainwater tanks or a gravity-fed system, you can integrate the heater by using quick-connect couplings. For instance, add a hose quick connector to your tank's outlet, so whenever you want hot water, you just clip on the Camplux inlet hose. Likewise, if you have a plumbed sink/shower, you could have a diverter valve to switch between cold water direct and hot water via the Camplux. There are many DIY possibilities (consult a plumber for complex setups to stay compliant).
Energy Planning: Off-grid means you need to track your gas and water usage. A 9 kg LPG bottle will last quite a while with these efficient heaters, but if you're using it daily for a family, have a spare gas bottle on hand. Water-wise, consider using a low-flow shower head to conserve water. Also, if power is scarce, note that only the pump (if you use one) needs electrical power – which can come from a 12V battery or solar setup. The heater itself only needs those D batteries for ignition. This means you can have hot showers completely off-grid without a generator. Many Aussies living off-grid pair these heaters with solar panels (to recharge a battery running the pump). For more on usage and costs, see this note on energy consumption.
Climate and Maintenance: In rural areas, you might face tougher conditions – frost, dust, critters. In cold climates (e.g. High Country winters), always drain the unit to prevent freeze damage. Consider bringing the unit indoors (only for storage!) if it's going to freeze overnight. For dust and bugs, occasionally check the burner area – spiders love small nooks and can clog gas burners (a common issue called "spider webs in the burner"). A soft brush or compressed air can clean out any debris during maintenance. And as with any gas gear, inspect hoses and connections regularly; replace the gas hose every few years or if you see cracks. This ensures your heater stays in top shape for the long run.
Caravan and Camper Tips (Traveling & Touring)
Quick Setup at Campsite: For caravaners, convenience is king. You can set up your Camplux so it connects to your caravan's systems with minimal fuss. For example, install a quick-connect fitting on the water line from your caravan's tank/pump, so when you stop and set up camp, you simply click the Camplux's water inlet into your van's water supply. Do the same for gas: many RVs in Australia have an external gas bayonet fitting for BBQs – you can get a hose that plugs from that bayonet to the Camplux, saving you from lugging a separate bottle (get a gas plumber to help with this to ensure it's done right). This way, you don't have to undo the regulator every time; just quick-connect and go.
Mounting on the Van: Some people mount the water heater on the exterior of their caravan or camper trailer. You might attach a bracket to the side of the van or on a rear swing arm. If you do mount it, make sure it's in a ventilated spot and not inside an enclosed boot (unless that boot is designed as a vented heater box). A clever idea is mounting it on the inside of a side hatch door that swings open – so when you open it, the heater is outdoor and ready; when you close it, it's packed away. Just ensure any such custom setup follows ventilation guidelines and consider consulting a professional to be safe. Always disconnect and stow the heater when driving to protect it from vibration and damage.
Using Van's Pump and Power: If your caravan has an onboard water pump (most do), you can use it to feed the heater. Those pumps typically provide plenty of pressure. Just mind that running the hot water through your van's plumbing might require mixing valves if you tie it into an internal shower. Many caravaners actually use the Camplux as an outside shower solution – perfect for rinsing off after the beach or giving the kids a wash while keeping the sand and mud out of the van. In that case, the setup is similar to camping: heater outside, hose to a tent or shower stall. You can even use the van's 12V outlet to power an external pump if needed (though usually not necessary if the van's pump is used).
Stowage: Find a secure spot in your caravan to store the heater when not in use – maybe a front tunnel boot or under a bed. Secure it so it doesn't bounce around. Remove the batteries during long storage to avoid any corrosion issues. If you're doing a big trip with varied climates, remember the earlier tip: drain it if you hit cold regions, and keep an eye on gas consumption (refill or swap gas bottles in larger towns when you can, so you're not caught without gas in the middle of nowhere).
Pro Tip: Many caravan parks in Australia have their own rules. If you're at a powered site with showers, you might not need your heater – but hey, nothing beats your own private hot shower by your caravan! Just be mindful of water runoff and neighbours (use a proper catch tray or drainage if required, and maybe shower at non-peak times so you're not splashing near someone else's tent). Also, check if the park has any restrictions on gas appliances – generally, it's fine, but some places might have rules during total fire ban days.
Conclusion: Stay Safe and Enjoy the Hot Water!
By now, you should be feeling pretty confident about setting up your Camplux 6L, 8L, or 10L portable water heater. With a bit of practice, you'll be able to rig up a hot shower in no time – whether you're camping on the beach, living off-grid on a rural block, or touring Australia in a caravan. The tone of this guide was casual, but remember, safety is key: always follow the guidelines and use common sense.
Follow Local Gas Regulations: In Australia, gas fittings and modifications are regulated. While connecting a portable appliance to a gas bottle is okay for a DIYer, any permanent gas installation (or if you're unsure about something) should be checked by a licensed gas fitter. Always use equipment as directed.
Use Outdoors Only: We've said it a few times, but it's worth repeating – these heaters must be used in open-air environments. Carbon monoxide is no joke. Never enclose the unit, and always ensure ventilation.
Monitor for Leaks or Issues: Occasionally inspect your hoses and connections. If you smell gas (a rotten egg smell) during use – turn everything off and check immediately. If the heater's flame goes out and doesn't re-light while water is running, turn off the gas and water and troubleshoot. And of course, keep the unit clean and maintained per the manual's recommendations.
With that, it's time to enjoy the comfort of hot water on your adventures. Nothing beats a warm shower under the stars after a long day of hiking or a surf session at the beach. Your Camplux heater will serve you well on all your Aussie escapades – from the outback to the backyard.
Happy camping, and stay safe! And if you need more info or accessories, be sure to visit the Camplux Australia website for support and tips. Now go out there and enjoy a steaming Aussie shower wherever you roam, you've earned it!


